How to Do Easy Cross Hatching With Micron Pen
I've been creating and teaching art for several years and love helping new artists grow and find their own voice.
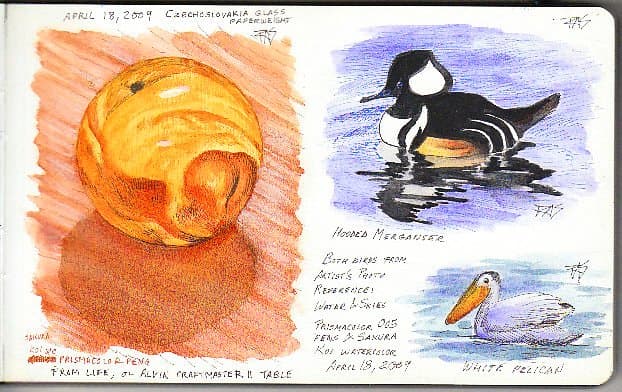
Glass and Birds Page in my Moleskine watercolor journal by Robert A. Sloan
Hatching and Crosshatching Shading
In Glass and Birds Page, above, I used hatching and crosshatching with fine point colored pens to create values and shapes in an orange glass paperweight and around two birds. I used watercolor washes over the ink lines because I was using waterproof pens, so they're a little less distinct but still definitely there. This technique is the essence of the Claudia Nice method of pen and watercolor realism, as found in numerous books she's published.
I recommend Claudia Nice's omnibus volume, Painting with Watercolor, Pen & Ink, to cover a wide variety of subjects and techniques in pen and ink with watercolor. It has glass marbles, surf on the shore, animals and birds, people, architecture, a wide variety of textures, including rusty metal and shiny chrome effects. So if you like that style of realism, please do consider getting her book or asking your local library to buy it. She has published many others on specific subjects like painting weathered buildings or animals.
The great advantage of hatching and crosshatching for texture is that you can do this technique with anything that can make a mark. It's very effective in ballpoint pen on the backs of envelopes and junk mail as much as with technical pens on fine Bristol or watercolor paper. You can do it in pencil to shade easily or use colored pencils to blend colors optically in a vibrant, powerful way.
I will be using pens for my examples, but you can do this as easily with pencils of any kind. Some artists prefer using crosshatching and hatching for all shading; others combine it with other textures for a pleasing effect. It has another advantage—a gorgeous vintage look reminiscent of old postage stamps, money, and newspaper engravings.
Here's basic hatching and crosshatching, a series of examples in pen.
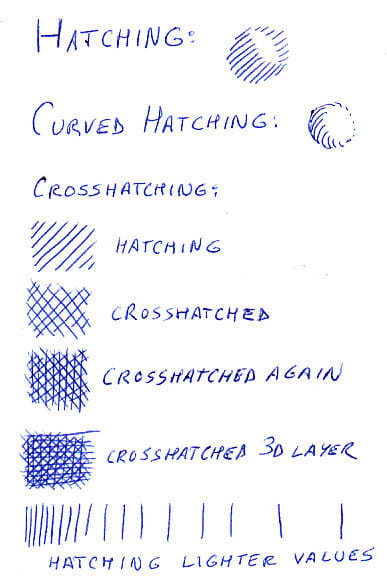
Hatching and Crosshatching Examples in ballpoint pen on paper. Robert A. Sloan
Hatching and Crosshatching Are Easy!
Practicing hatching and crosshatching is quite simple, and you really only need a few supplies!
Materials Needed
- Pen, pencil, crayon, or anything that makes linear marks.
- Paper or something to draw on. Grocery bags, Post-it notes, and printouts work.
Practicing your hatching and crosshatching skills is a good way to doodle when you're on the phone or waiting for anything. I did a lot of shading bars with crosshatching as a kid, getting used to the feel of it.
I discovered rapidly that it helps to keep the lines short. When filling large areas, doing separate groups of lines is a good hatching or crosshatching texture. Otherwise, the long lines are liable to get wobbly and not be that even in how they fill the space, which looks crude and may break up the levels of value you're trying to establish. Here's a typical shading bar doodle done in hatching and crosshatching.
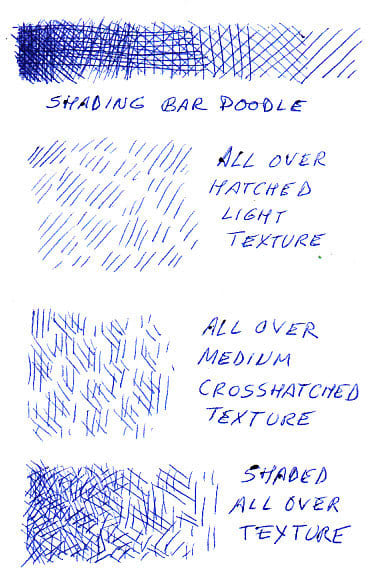
Crosshatching some overall textures and a shading bar done with crosshatching. Ballpoint on paper.
Line Width, Interval, and Line Angle
Hatching is a method of shading with lines that are all parallel. They may be broken lines—this is a way to get lighter values and also to cover large areas where single lines might be hard to keep straight and parallel.
When they break entirely into dotted lines, you get the kind of fine light values that money and old postage stamps show in the lighter areas of, say, Washington's skin tone. Hatching and crosshatching are the ways engravers get most of their shading.
Most traditional engravings use expressive curved lines like my Curved Hatching shaded round example. The lines trail off into dotted lines to give lighter values than just lines by themselves can and become more expressive by curving to suggest the curves of the face. This is difficult and tricky; it takes a lot of practice. If you're seen copying money at work, it could even lead people to wonder what you're doing on your off time.
Scroll to Continue
Read More From Feltmagnet
But it's as common to see this sort of thing on old postage stamps if you use a magnifier to look at them. Modern ones are printed more like your printer in full color, but for a good century or more, stamps were usually monochrome and shaded entirely by engraving.
That's what caught my imagination as a child. I was in awe of artists that could draw and ink Lincoln's face as tiny as my thumbnail to put it on a stamp, even if they did make a plate and then print from it.
The thinner a line you use, the finer the texture of the hatching. If you put the lines closer together, the hatching will look like a darker value—the shading at the bottom of my first page of examples shows how interval helps create lighter and darker values. When the line width is thicker than the interval, it can look very dramatically dark.
When the interval between the lines is about the same as the lines themselves, it's medium-dark and very pleasing. Two or three line widths between the lines is comfortable. Much more than that, and the lines may read as separate, distinct objects instead of part of a pattern. So in doing light values over large areas, it's better to separate groups of lines with a bit of space and place them irregularly but evenly over the whole large area.
Do that in two or more layers, and you can start shading a big background area even with a reasonably fine point pen and have an even middle value behind the whites and the darks. You can add more layers over that hatching by patches texture, doing the same thing at different angles. I often did backgrounds for pen and ink portraits that way, even if I stippled the features to get a smoother texture. Sometimes I crosshatched the faces too.
You can shade anything in ink that you could do in pencil shading. If you're hatching shading in ink, it does help to pencil the outlines of what you're drawing first so as to know where the light and dark areas are. Do a contour drawing of the basic shape and outline it lightly; you'll erase this contour drawing after the inking.
Below is a pencil sketch of my pillbox, which I'm going to ink and shade with hatching and crosshatching using the same ballpoint pen as my examples. I'll show how curved hatching helps make a rounded object look more rounded and how careful parallel line hatching within the crosshatching helps make the cylindrical base look flat—some of my lines will curve around the form, and others not.
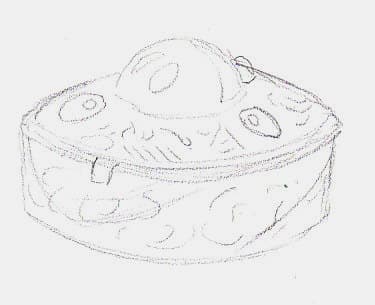
Pencil sketch for crosshatched and hatched drawing of my pillbox. Robert A. Sloan.
Sketching for Crosshatching
I drew my pillbox in perspective, drawing outlines for interior value changes like the bright highlights on the four gems and two shadow areas I wanted to define on the base. I sketched a few loose lines to imply the designs on the complicated little metal object, not in too much detail because I didn't do it large enough to get the details of each design at that angle.
You don't have to get extremely detailed with a contour sketch. Some of the detail can just be added with shading; how much you pencil first is a matter of your taste and personal habits. Your working method may require you to make meticulous, extremely detailed diagrams of where every value change goes, or you may be happier with just a few sketch lines and do all the details in ink. It's entirely up to you. Try it both ways if you're not sure.
If you're not comfortable with creating volume and roundness by shading, I would suggest penciling everything because you can always erase and fix a pencil version easier than the inked version.
I could have continued this drawing in pencil and shaded it with crosshatching, but I preferred to keep all my examples in pen for easier scanning.
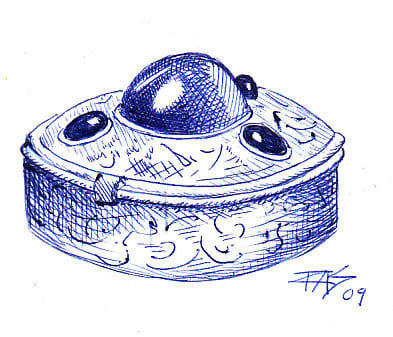
Pillbox Drawing in ballpoint pen on sketchbook paper by Robert A. Sloan
Curved Hatching Combines With Straight Hatching Lines
On the rounded gem in the center of the pillbox, I combined several layers of curved hatching to accentuate its roundness. It's rounded and shiny. So I layered it darker according to how the highlights fell on and within it and shaded one large highlight completely with parallel hatching just to make it a middle value to contrast with the stark white highlights. Those fine curved lines, about a line width apart, make a much smoother texture and help give it volume.
On the base, I used curved hatching lines following the curve of the cylinder when I did horizontal ones but used parallel verticals because the sides are vertical. This helps establish shape as well as light and dark values. Narrow angled hatching gives the tab for opening the pillbox a medium value tone. The curling lines suggesting the patterns on the box gave enough value themselves to keep the light values even. I added some hatching to some areas to show they were darker.
This drawing is just one example of the ways you can shade using hatching and crosshatching. Experiment with it while doodling. Draw five shapes and try filling them with five different values. Try using different thicknesses of lines and lengths of lines to see what will happen. Overlap hatching patterns with other pen textures to see how they combine.
Hatching and crosshatching seem simple, but the key to doing it well is to practice so that your lines are confident, intervals even and repetitive. The more evenly something is crosshatched or hatched, the easier the texture disappears into a perception of light or dark values. Don't use long lines when short lines will do. Don't fill solid areas with wobbly long lines; try to hatch across the shortest distances you can because it's easier to repeat that way.
Try hatching and crosshatching any drawing or design you come up with. The more you do it, the easier it becomes. Shading bars are the perfect time-killing doodle—until you start drawing real things on your desk because that got too dull.
Enjoy!
Dario on October 29, 2014:
Great description! ThnX!
Victoria Van Ness from Fountain, CO on January 15, 2014:
What beautiful artwork. I will never be an artist, but I can appreciate it. :)
Nicole Quaste from Philadelphia, PA on January 08, 2014:
Very helpful, thank you so much!
Liz Elias from Oakley, CA on September 05, 2013:
Congratulations on Hub of the Day!
This is a great set of examples, with clear explanations. My husband is also an excellent artist, and has tried to teach me, but I seem to be an artistic dunce.
I struggle most with perspective. I love to watch the re-runs of the old Bob Ross shows..he makes it all look SO easy!
Voted up and across.
Cathy Nerujen from Edge of Reality and Known Space on September 05, 2013:
Wow, a drawing guide and useful photos to show how to do it. I am so impressed. I'm glad I found this. Bookmarked for reference. Thank you. :)
Maria Giunta from Sydney, Australia on September 05, 2013:
This is a great tutorial, it's so easy to follow and you have used excellent photos to explain how to draw. Worthy of a hub of the day, well done. Voted up and useful as well as pinned.
debraw50 on September 05, 2013:
Hi Robert, I like your hub, very interesting and also awesome. I like the way you explain in detail how you draw.Keep up the good work.
W1totalk on September 05, 2013:
I had seen your hub and I found out on Nintendo Wii U they have a drawing program called Art Academy that let's you draw with realistic materials onscreen. These techniques are epic and have been used in the program. The way you describe it make it really interesting. Great hub.
Stephanie Bradberry from New Jersey on September 05, 2013:
I love the way you explain the different techniques with drawings and short descriptions.
Well done and congratulations on your Hub of the Day!
Bill on September 05, 2013:
Great hub. I will have to try this technique. I really like the way it enhances traditional shading.
Kia L from ATL on September 05, 2013:
I like!
RTalloni on September 05, 2013:
Really nice look at shading. You've made want to stop everything and do some drawing. Maybe I'll go outside for a while and see what this end of summer/beginning of fall season could offer my drawing pad... Pinning to my Home Education board. Congrats on your Hub of the Day award!
cheeluarv from INDIA on September 05, 2013:
Congrats for Hub of the Day,Your hub on hatching and cross hatching is educative,interesting as I like drawing and painting and voted up useful for this well explained hub.
quantumthots from THIRD ROCK FROM THE SUN on September 05, 2013:
This is a very interesting and educative article.
Patricia Scott from North Central Florida on September 05, 2013:
This is very detailed and produces a very interesting result. This is not my strong area at all...I may have to defer to others whose talents lie in this area but I do admire it.
Congrats on HOTD.
PInned
larakern from Georgia on July 19, 2013:
Thank you for sharing this tutorial. I've been having serious problems with shading techniques so hopefully this will help a bit!
Gypsy Willow from Lake Tahoe Nevada USA , Wales UK and Taupo New Zealand on July 16, 2011:
Thank you for the lesson. I shall experiment and add it to my art when appropriate.
StephenJ on July 05, 2011:
crosshatching and hatching are probably the least realistic ways to shade when drawing unless blended with a paper stump or tortillion. But is a very useful skill to learn and a recommended one at that. Great article!
grayghost on May 01, 2011:
Very informative and helpful. Like NewHorizons (above) I like to draw but have never had any formal instruction. Your how-to hubs are a great help. Thanks!
Ros Webb from Ireland on January 29, 2010:
I love crosshatching; it's fast and fun.
maria fernandes from Figueira da Foz Portugal on November 19, 2009:
I liked your Hub!A few months ago I attended a workshop illustration and got interested in pencil drawing.I searched for intel in the net and I found a few articles.This one is very clear and usefull.Thanks!
robertsloan2 (author) from San Francisco, CA on October 26, 2009:
Glad this was useful, Mike! I know what you mean -- for a long time I seriously envied people who could just draw with a ballpoint when they're out instead of needing a pencil.
Mike Lickteig from Lawrence KS USA on October 23, 2009:
Nice hub that demonstrates well how to "work" a drawing with lines. I have gone back and forth between using lines to indicate shading through textures and using a tortillion. I've been using pencil less lately, so line work has been more prevalent. Thanks for sharing your knowledge!!
rvsource on October 02, 2009:
Very true!
robertsloan2 (author) from San Francisco, CA on October 02, 2009:
Thanks, rvsource -- yeah, a tortillon gives such smooth beautiful shading. This works better though if I'm working with a pen, especially with a ballpoint if I'm not near my art supplies and don't have a pencil handy.
rvsource on October 01, 2009:
Nice hub Robert
I prefer to shade using a tortillion though. I find that method best for me.
robertsloan2 (author) from San Francisco, CA on September 25, 2009:
Thank you both! NewHorizons, don't worry about it, half of the great artists of the world never had any instruction and just learned from books and trial and error. It's possible to get very good at it without formal instruction.
Joseph Attard from Gozo, Malta, EU. on September 24, 2009:
HI there, Very informative and instructive. Great value. thanks. I like to draw, but never had any instuction, so I find Hubs like yours very useful.
Luciano Bove from Paris on September 24, 2009:
Great hub very simple and clear! Cool.
Source: https://feltmagnet.com/drawing/How-to-Draw-Shading-with-Hatching-and-Crosshatching
0 Response to "How to Do Easy Cross Hatching With Micron Pen"
Post a Comment